

Step Into American Heritage With The Seager x Justin Trailboss Boot
Mar 12, 2026News
Chains, Bands, and Bigger Gains: A Weightlifter’s Guide to Accommodating Resistance
- Jun 2, 2025
- 0 Comments
1282
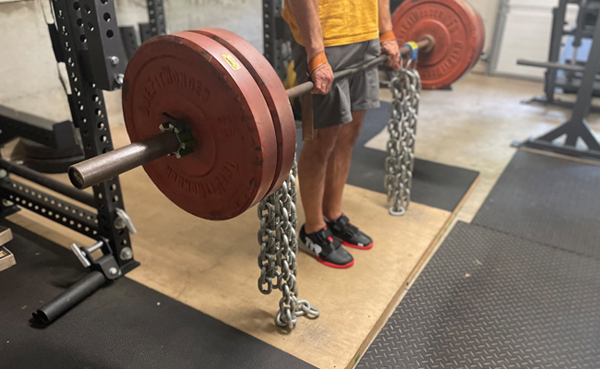
You’ve probably seen powerlifters deadlifting or squatting with chains draped from their barbells.
It looks and sounds badass — but it’s not just for show.
Putting chains (as well as bands) on your barbell is called accommodating resistance, and it can be a useful tool to help you break through lifting plateaus and hit new PRs.
As you lift a barbell to which chains have been attached, the chains gradually rise off the floor, increasing the load as the barbell gets higher.
You can also get this variable resistance by using elastic bands. You attach one end of the band to the barbell and the other end to an anchor near the floor. At the bottom of the lift, the bands are slack, but as you raise the barbell, the band stretches and increases tension, making the barbell feel heavier as you get to the top of the lift.
Back in my powerlifting days, my barbell coach, Matt Reynolds, incorporated chains and banded lifts into my programming quite a bit. I really enjoyed them because they added variety to my training and helped me get past some sticking points in my lifts that had plagued me for months.
To help walk us through the benefits of accommodating resistance and how to incorporate it into your programming, I hopped on the horn with Matt to get his insights and advice.
A Brief History of Accommodating Resistance
The idea of varying resistance through a lift’s range of motion has been around since the early days of strength training. Early 20th-century strongmen would use chains in their exercises to vary the load during the lift. In the mid-20th century, Soviet powerlifting legend Vasily Alekseyev would do his lifts in waist-high water to add some accommodating resistance to his exercise.
It wasn’t until the 1990s that accommodating resistance became a popular tool among powerlifters. And the man who had the biggest impact in spreading its use was Louie Simmons of Westside Barbell.
Simmons began attaching heavy chains to barbells to accommodate the body’s changing leverage throughout the lift. He later started using elastic bands with his lifters as an alternative way to provide accommodating resistance.
Why Use Accommodating Resistance
Here’s what accommodating resistance offers:
Matches Your Strength Curve. The biggest reason you would use accommodating resistance is that it makes the lift match your strength curve: you’re stronger at the top of lifts like the squat and bench press than you are at the bottom.
As you lift a barbell outfitted with accommodating resistance, the chains gradually rise off the floor or the bands stretch, increasing the load as the barbell goes higher and higher and getting the heaviest at the top of the movement. Thus, the lift is lighter at the bottom, where you’re weakest, and heavier at the top, where you’re strongest. “By increasing the resistance as you move into the stronger parts of your lift, you recruit more muscle fibers, which helps with strength and hypertrophy,” Matt told me.
Increases Power and Bar Speed. “Accommodating resistance forces compensatory acceleration,” Matt says. “You’re kind of in a race to the top. The bar gets heavier as you lift it, so it teaches you to push harder all the way through.” This develops explosive strength by requiring a high rate of continuous force.
Overcomes Sticking Points. At some point in your training career, you’ll discover you have sticking points — places in the lift where you can’t seem to go any further. For example, I had a period where I was having trouble locking out my bench press. I started adding chains to the lift and because the barbell got heavier as it moved up, I was able to really train getting through lockout. Once I took the chains off, the barbell just felt super light throughout the lift.
As Matt explains, because accommodating resistance overloads the parts of a lift where you’re strong and keeps the weight light where you’re weak, you get “more velocity going into the sticking point; you often get higher up and in a better leverage position before the sticking point really catches up with you.”
Challenges your muscles in a different way. Accommodating resistance, especially in the form of bands, forces you to stabilize the bar. It also improves bar control and requires you to stay tight throughout the lift.
Chains vs. Bands: Pros, Cons, and Best Uses
There are two ways to add accommodating resistance: chains and elastic bands. Each one has its pros and cons:
Chains. Chains provide a resistance curve that deloads and loads in a more linear way compared to bands. As Matt explained, “They don’t actively pull down on the bar; standard gravity applies.” That makes them easier to control and more forgiving. Chains are easy to set up. Just hang some chains from the bar. (I’ll show you how below.) They’re ideal for beginners and excellent for matching the strength curve while still helping with sticking points.
Bands. Bands offer more extreme variable resistance. “Bands actually increase the speed of gravity,” Matt said. “What I mean by that is if you let go of the bar, it would fall faster than gravity alone because the band is actively pulling the bar down.” Bands also introduce horizontal forces, so if your form is off, you’ll know. They’ll yank the bar out of alignment, making them less forgiving but more effective for exposing weaknesses.
They’re also more intense, which makes them better for advanced lifters seeking explosiveness. The other upside of bands is they are cheaper and quieter than chains. You can use bands at a public gym without causing a clanging metallic ruckus.
One of the downsides of bands, I think, is that they’re kind of a pain to set up. You need a squat rack that will allow you to use band pegs. And you have to make sure you place the bands on the barbell evenly so that everything remains nice and smooth during the lift and you’re not getting pulled in different directions.
When to Use Chains or Bands
Start with chains if you’re new to accommodating resistance. They’re more forgiving and help you build confidence in your lockout without compromising form. Bands are better for experienced lifters who want to train explosively and work on bar control and speed.
“When you’re really trying to get fast and explosive, bands are probably the better choice,” Matt noted. “But for hypertrophy and learning to get through sticking points, chains are awesome.”
How to Program With Accommodating Resistance
Here’s Matt’s guidance on programming:
- Use accommodating resistance no more than once per lift per week.
- Favor chains if longevity is the goal; bands for short bursts of explosive training.
- Use bands for 4–6 weeks before deloading and taking a break from them.
- Use chains for 6–8 weeks before deloading and taking a break from them.
The reason there’s a differential in the length of time you can train with chains versus bands is that bands are harder on the body while chains are easier.
Use Accommodating Resistance in Your Supplemental Lifts
Matt thinks one of the best ways to add accommodating resistance is to use it with your supplemental lifts. That’s how he programmed it for me when I was using it regularly.
A sample week of barbell training with accommodating resistance might look like this:
- Upper Day 1: Main Lift — bench press; Supplemental Lift — chain shoulder press
- Lower Day 1: Main Lift — squat; Supplemental Lift — chain deadlift
- Upper Day 2: Main Lift — shoulder press; Supplemental Lift — chain bench press
- Lower Day 2: Main Lift — deadlift; Supplemental Lift — chain squat
Setting Up Your Barbell for Chain and Band Work
To get the full benefit of accommodating resistance, setup matters. Here’s how to do it right:
Chains
I got my chains from Rogue Fitness. I got the 5/8″ chain kit, and it comes with:
- (2) 15LB lengths of 5/8″ chain with carabiners. I’d get two more 15LB lengths of the 5/8” chain, so you’ll have 30 pounds of total chains to work with.
- (2) 4′ lengths of 1/4″ chain with carabiners. This is your leader chain that you’ll hang from your barbell. Once you’ve got that leader chain hanging from the barbell, you’ll hang the heavier 15LB chain lengths on it.
In addition to a chain set, get yourself some EZ Straps. They make attaching chains for deadlifts a breeze. More on that in a second.
Secure the Chains to the Bar
For bench, squat, or press, you’re going to loop the small leader chain around the barbell sleeve, like so.
Then attach the big ol’ heavy chains to the leader chain with a carabiner. Attach the carabiner to the leader chain so that when you’re at the top of your lift, one or two chain links should still be on the floor.
Should look like the above when all is said and done.
For the deadlift, just place your EZ Straps on the deadlift bar and thread your chains through the rings.
Super easy!
Bands
In my opinion, bands are kind of a pain in the butt to set up. If you don’t set them up evenly on both sides, your lift is going to be screwy.
You can also use bands on weight machines if you’re a machine guy.
Deadlift
Anchor the bands to band pegs in your squat rack. You’ll need four pegs like above. If you don’t have band pegs, you can loop them around heavy dumbbells, but anchored bands are more secure.
Start with light or medium bands. When you set up your bands, the band should have slight tension, even at the bottom of the lift. This will typically require you to double up the bands.
Squat
You’ll also need band pegs for the squat. Place the band pegs in the middle of the rack where your midfoot would be when you unrack and walk back the weight.
Remember, bands pull down harder than gravity, so you gotta stay tight and controlled during the lowering phase.
By incorporating accommodating resistance, you can train more explosively, recruit more muscle fibers, and bust through your sticking points.
And when you’re using chains, you’ll look like a badass doing it.
Give it a try and soon you might be hitting a new PR.
Disclaimer: This story is auto-aggregated by a computer program and has not been created or edited by menshealthfits.
Publisher: Source link
Publisher: Source link